A CO2 scrubber is a simple device that cleans the air by pulling out excess CO2, making the space safer for everyone. Installing one doesn't have to be a headache if you follow these five straightforward steps. This guide walks you through the process so you can set up your CO2 scrubber quickly and get back to running your operations smoothly.
Pick the Right Spot
Start by finding the best place for your CO2 scrubber. You want it where CO2 builds up the most, like near exhaust fans, production lines, or enclosed work areas. Make sure there's enough room around it—about two feet on each side—for air to flow freely and for easy access during checks.
Think about power sources too. Most units plug into a standard outlet, but check if yours needs something special. Avoid damp spots or direct sunlight to keep it running well over time. Once you've marked the spot, measure the area to confirm your CO2 scrubber will fit without blocking doors or pathways. This step sets the foundation for everything else.
Gather Your Tools and Parts
Before diving in, round up what you need. You'll typically want a drill, screwdriver set, level, duct tape, and maybe some brackets if your model requires wall mounting. Your CO2 scrubber should come with a manual listing extras like filters or hoses—double-check the box.
Safety gear is non-negotiable: gloves, goggles, and a dust mask protect you from any particles kicked up during setup. If your unit connects to existing vents, grab compatible tubing. Lay everything out nearby to avoid stopping midway. Taking time here prevents frustration later and ensures a clean install.
Mount the Unit Securely
Now, secure your CO2 scrubber in place. For wall models, use the level to mark drill holes straight, then fasten the brackets firmly into studs or solid surfaces. Hang the unit and tighten all screws—give it a gentle shake to test stability.
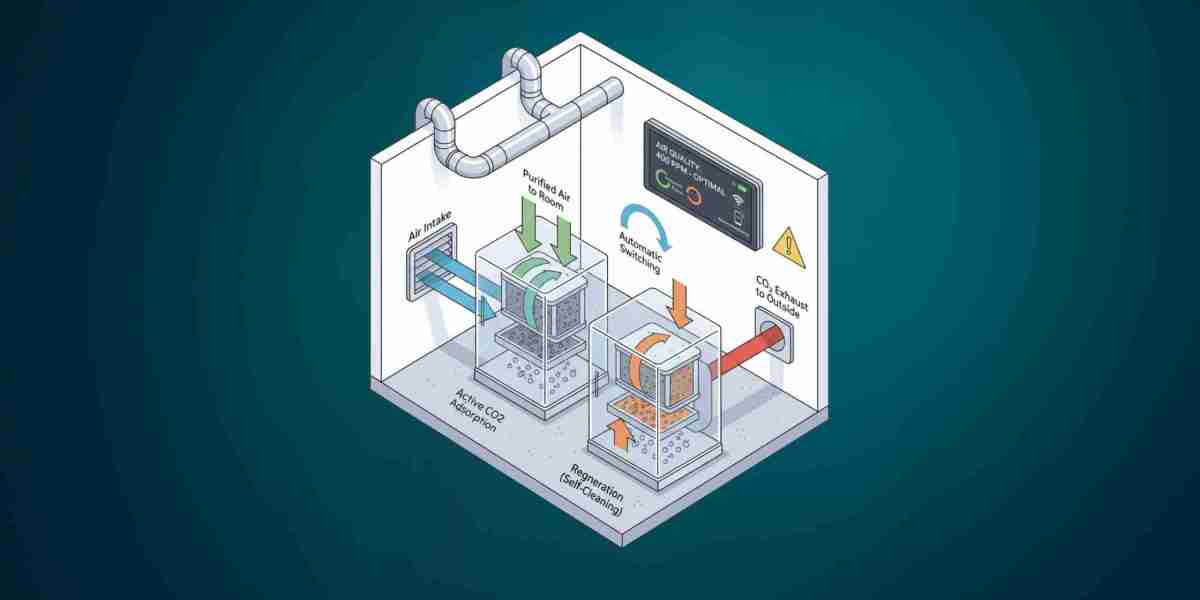
Floor-standing ones are easier: just position them level and use any included weights or anchors if the floor is uneven. Connect any intake or exhaust hoses next, sealing joints with tape to stop air leaks. A tight seal means your CO2 scrubber works at full power, trapping more CO2 without wasting energy. Step back and eyeball it—does it look steady?
Wire It Up and Test the Airflow
Plug in the power cord or connect to your electrical setup, following the manual's color codes if wiring directly. Flip the switch to on and listen for the fan—it should hum steadily without strange rattles.
Test airflow by holding a tissue near the intake; it should pull strong. Run it for 10-15 minutes in an empty space first. Use a basic CO2 monitor (cheap ones are available online) to check if levels drop. If not, tweak hose connections or reposition. This trial run catches issues before full use.
Set Up Maintenance and Monitor
Installation wraps up with a plan to keep your CO2 scrubber going strong. Note the date and set reminders every three months to swap filters—dirty ones lose effectiveness fast. Wipe the exterior weekly and inspect hoses for cracks.
Train your team on daily checks: glance at indicator lights and note any odd smells or noises. Log CO2 readings weekly to spot trends. With regular care, your CO2 scrubber can last years, cutting risks like headaches or fatigue from bad air. In busy industrial settings, this simple habit saves lives and downtime.
Wrapping it up, following these five steps turns installing a CO2 scrubber into a quick win for safety. No fancy skills needed—just patience and the right prep. Your workplace will feel fresher, workers stay sharper, and you'll meet safety rules without stress. Give it a go, and notice the difference in air quality right away.